Should you repair vinyl siding yourself or hire a professional? Learn when a simple DIY repair may work, when flashing and water damage require an experienced contractor, and how improper siding repairs can create costly leaks.
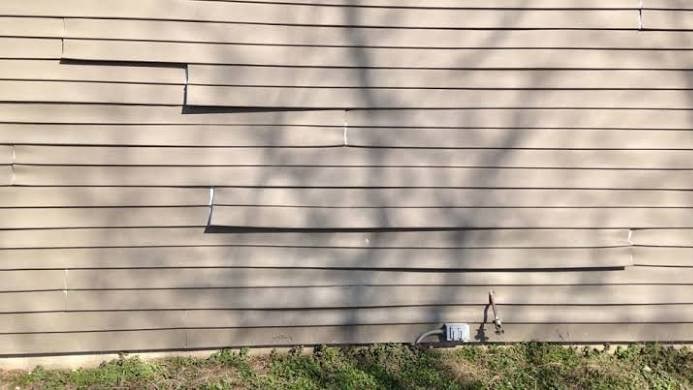
Vinyl Siding Repair Guide
```DIY Vinyl Siding Repair vs. Hiring a Professional
Some vinyl siding repairs are simple enough for a careful homeowner. Others involve flashing, water intrusion, upper-story access, discontinued materials, or concealed wall damage that should be handled by an experienced siding contractor.
```The difference is not always the size of the damaged area. A single loose panel near ground level may be a reasonable do-it-yourself project, while one cracked panel beneath a leaking window may require removal of several courses, inspection of the water-resistive barrier, and reconstruction of the flashing detail.
```Before beginning a repair, consider the cause of the damage, the location of the panel, the condition of the wall underneath, and whether you can complete the work without creating a path for water.
```The Simple Answer
```DIY vinyl siding repair can work when the damage is minor, safely accessible, and limited to the siding panel itself. The replacement material should be compatible, and the homeowner should understand how vinyl siding locks, moves, and fastens.
Professional repair is usually the better choice when damage involves water, flashing, windows, doors, rooflines, electrical equipment, multiple panels, high walls, or uncertainty about the condition behind the siding.
```DIY Repair vs. Professional Repair
```| Repair Condition | DIY May Work | Hire a Professional |
|---|---|---|
| Loose panel | The lock is intact, the area is at ground level, and no moisture damage is visible. | The panel repeatedly loosens, the lock is broken, or surrounding siding is damaged. |
| Single cracked panel | A matching replacement is available and the wall underneath is sound. | The crack is near a window, door, roofline, utility penetration, or damaged flashing. |
| Missing siding | A small, accessible section is missing and the water-resistive barrier is undamaged. | Sheathing, housewrap, trim, or several courses are exposed or damaged. |
| Water stains | DIY diagnosis is generally not recommended because the entry point may be concealed. | Professional investigation is needed to trace the flashing and drainage failure. |
When DIY Vinyl Siding Repair Can Work
```A homeowner with the right tools and a basic understanding of vinyl siding installation may be able to complete a limited repair. The work should be low enough to reach safely and should not involve a known leak or concealed deterioration.
Reasonable DIY Conditions Include:
- One loose panel with an undamaged locking edge
- One cracked panel in an open, ground-level wall area
- A matching replacement panel is already available
- The surrounding siding remains flexible and intact
- The housewrap and sheathing show no visible damage
- The repair does not involve windows, doors, roofing, or utilities
- Safe ladder or roof access is not required
- The homeowner has the correct siding tools and fasteners
Tools Commonly Needed for a Basic Repair
```Vinyl siding should be unlocked and reconnected with tools designed for the material. Pulling panels apart by force can crack the locking edge or damage the course above.
- Vinyl siding unlocking tool, commonly called a zip tool
- Flat pry bar
- Hammer
- Aviation snips or vinyl siding shears
- Tape measure
- Utility knife
- Manufacturer-approved corrosion-resistant fasteners
- Eye protection and appropriate work gloves
A Basic Single-Panel Repair Process
```- Identify the complete damaged panel. Check the locking edges, nail hem, surrounding panels, trim, and wall underneath.
- Unlock the panel above. Use a siding zip tool to release the lower lock without cracking the vinyl.
- Remove the damaged panel’s fasteners. Work carefully to avoid puncturing the water-resistive barrier.
- Inspect the concealed materials. Stop the repair if the housewrap, flashing, sheathing, or framing is wet or damaged.
- Cut and install the replacement. Maintain the expansion clearance required by the siding manufacturer.
- Fasten the siding correctly. Center fasteners within the slots and avoid pinning the panel tightly to the wall.
- Reconnect the course above. Confirm that the lock is engaged continuously across the repair.
When DIY Repair Does Not Work
```A siding repair becomes more complicated when the visible damage is connected to another exterior component. These conditions often require removal of a larger area and an understanding of flashing, drainage, and wall construction.
Hire a Professional When:
- Water stains or damp materials are present
- The damage is around a window or exterior door
- The repair is near a roof-to-wall intersection
- Step flashing or kick-out flashing may be involved
- Several siding courses are loose or missing
- The wall is above the first story
- Electrical service equipment or utility lines are nearby
- The siding profile or color is difficult to identify
- The existing panels are brittle and crack during handling
- Sheathing, framing, or trim shows signs of rot
- The same panel has already been repaired more than once
Improper Repairs Can Cause Leaks
```Vinyl siding is not designed to be completely watertight. It sheds most rain while the water-resistive barrier and flashing behind it manage incidental moisture.
A repair that punctures the housewrap, reverses a flashing lap, blocks drainage, or seals water inside the wall can create a leak even when the siding looks finished from the outside.
Water may travel behind several courses before becoming visible indoors. The stain can appear far from the original repair, making the cause difficult to identify later.
```Common DIY Mistakes That Can Lead to Water Damage
```- Face-nailing the siding: Driving fasteners through the visible panel surface can create holes and restrict movement.
- Using excessive caulk: Sealing the bottom of channels or panels can trap water that needs to drain.
- Puncturing the housewrap: Careless prying or cutting can damage the secondary drainage layer.
- Reversing flashing laps: Lower materials placed over upper layers can direct water into the wall.
- Treating J-channel as flashing: J-channel receives siding edges but does not replace window or door flashing.
- Installing siding too tightly: Panels without proper clearance can buckle and pull away from surrounding trim.
- Using incompatible replacement siding: A mismatched lock can disengage and allow the panel to loosen during wind.
- Covering wet or rotten materials: Closing the wall without correcting the moisture source allows deterioration to continue.
Why Caulk Is Not a Complete Repair
```Caulk can be useful at approved joints, but it should not be used to glue loose siding together, fill large cracks, replace flashing, or seal every edge of a trim channel.
Vinyl siding must move as temperatures change. A rigid bead of sealant can restrict that movement, collect dirt, separate from the panel, or conceal a broken lock.
A damaged panel should normally be properly re-engaged or replaced rather than covered with a surface patch that leaves the underlying problem in place.
```Window and Door Repairs Need Special Care
```Damage around windows and doors may involve sill flashing, jamb flashing, head flashing, utility trim, J-channel, sealants, and the water-resistive barrier.
Removing siding without understanding how these layers overlap can create a reverse lap or disconnect the flashing from the drainage plane.
If a window or door is leaking, replacing the nearest siding panel is unlikely to solve the problem unless the concealed flashing detail is also inspected and repaired.
```Roof-to-Wall Repairs Should Usually Be Professional
```Siding near a sloped roof must work with step flashing, kick-out flashing, roofing, gutters, and the water-resistive barrier. A mistake at this location can direct concentrated roof runoff behind the wall.
Roof access also creates fall hazards. Improper ladder placement can damage gutters, siding, roofing, and landscaping while putting the homeowner at risk.
When damage is located near an eave, dormer, chimney, porch roof, or roof-to-wall intersection, professional evaluation is generally the safer choice.
```Cost Is Not the Only Consideration
```DIY repair may reduce immediate labor costs, but an incorrect repair can become more expensive if it damages surrounding siding, allows water into the wall, or must be removed and completed again.
Professional pricing reflects more than the replacement panel. It may include diagnosis, product identification, safe access, specialized tools, removal, inspection, flashing correction, wall repair, cleanup, and warranty support.
The best decision is the option most likely to restore the siding correctly—not simply the option with the lowest initial cost.
```Color and Profile Matching Can Complicate DIY Repair
```A replacement panel needs to match more than the general color. The profile, visible exposure, locking system, thickness, and texture should also be compatible.
Older siding may have faded or been discontinued. A panel that looks close in a store or photograph may appear noticeably different when installed in direct sunlight.
Local siding suppliers and contractors may be able to identify the manufacturer, compare a physical sample, search current product lines, or recommend moving an original panel from a less visible wall.
```Safety Should Guide the Decision
```A small repair becomes a high-risk project when it requires roof access, tall ladders, scaffolding, work near power lines, or removal of siding above a steep grade.
Wind, wet grass, uneven soil, winter conditions, and landscaping can make ladder work less stable than it appears from the ground.
Homeowners should not accept significant fall or electrical risk to save the labor cost of a professional repair.
``````“A simple ground-level panel repair can be manageable for someone who understands how vinyl siding locks and moves. The concern is when a repair reaches windows, flashing, rooflines, or damaged wall materials. At that point, the work is no longer just about replacing siding—it is about protecting the complete exterior wall system.”
```
Questions to Ask Before Attempting a DIY Repair
```- Can I reach the damage safely from the ground?
- Do I know why the siding became damaged or loose?
- Do I have a compatible replacement panel?
- Do I have the correct siding unlocking tool and fasteners?
- Is the water-resistive barrier intact and dry?
- Does the repair involve flashing, roofing, windows, or utilities?
- Can I maintain the required expansion clearance?
- Will the repair affect an insurance or manufacturer warranty claim?
If any answer is uncertain, a professional inspection can help prevent a small siding problem from becoming a larger wall repair.
```When to Stop a DIY Repair
```Stop work if removing the panel reveals wet sheathing, torn housewrap, mold-like growth, rot, insect damage, missing flashing, or deteriorated framing.
These conditions require diagnosis and repair before the wall is closed. Reinstalling the siding may conceal the damage and allow the moisture problem to continue.
Save the removed panel, photograph the exposed area, protect it temporarily if necessary, and contact a qualified exterior contractor.
```Unsure Whether Your Siding Repair Is a DIY Project?
```A professional inspection can determine whether the damage is limited to one panel or connected to flashing, housewrap, trim, or hidden wall deterioration.
Schedule a free siding inspection with Suburban Construction to discuss safe, practical repair options for your home.
```Technical note: Siding repair requirements vary according to the product, wall construction, damage location, weather exposure, installation method, and condition of concealed materials. This article provides general educational information and does not replace manufacturer instructions, an on-site evaluation, or appropriate safety practices.
Share This Post
Share it on Facebook or X, or send it through your device share sheet for Instagram.