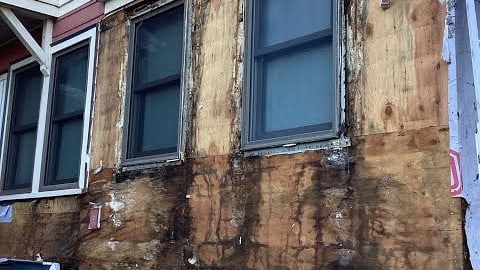
Hidden water damage behind vinyl siding can affect sheathing, insulation, framing, and interior finishes before the problem is visible from outside. Learn the warning signs Quad Cities homeowners should watch for, where moisture commonly enters, and when siding should be removed for inspection.
Quad Cities Siding Moisture Inspection Guide
```How to Spot Hidden Water Damage Behind Vinyl Siding
Hidden water damage behind vinyl siding can develop long before a homeowner sees an obvious leak. In Quad Cities homes, recurring storms, wind-driven rain, freeze-thaw cycles, aging windows, roof-to-wall intersections, and older flashing details can all contribute to moisture reaching the wall behind the siding.
```Vinyl siding itself is not intended to be the wall’s primary water-resistive barrier. Industry installation guidance explains that vinyl siding is an exterior cladding and should be installed over a continuous water-resistive barrier, with flashing integrated around windows, doors, corners, openings, and rooflines.[1][2]
```When that concealed drainage system is damaged, missing, reverse-lapped, or overwhelmed, water can remain behind the siding and affect sheathing, insulation, framing, trim, and interior finishes.
```The Difficult Part: You Often Cannot See the Damage
```Vinyl siding can continue looking relatively normal while moisture is affecting the wall behind it. A homeowner may see straight panels and intact corners while the sheathing near a window, roof intersection, or deck ledger remains wet.
Water can also travel before becoming visible. A stain near the bottom of a wall may originate several feet above it, and a soft area beneath a window may begin with failed head flashing rather than the siding directly beside the damage.
This is why diagnosing concealed water damage requires looking for patterns rather than simply searching for a hole in the siding.
```Hidden Water Damage Warning Signs
```| Warning Sign | What It May Indicate | Area to Inspect |
|---|---|---|
| Musty odor | Persistent moisture or possible concealed microbial growth. | Exterior walls, window cavities, basements, and wall penetrations. |
| Interior water stain | Rainwater or another moisture source may be moving through the wall. | Above and around the stain, especially windows and roof intersections. |
| Loose siding | Damaged fasteners, deteriorated substrate, or a previous storm event. | Sheathing, nailing surface, panel locks, and housewrap. |
| Soft trim or sheathing | Repeated wetting and possible wood deterioration. | Windows, doors, corners, decks, and lower roof edges. |
| Recurring paint damage | Moisture may be entering or condensing inside the wall. | Interior drywall, trim, window returns, and exterior penetrations. |
Warning Sign 1
```Musty or Damp Odors Near Exterior Walls
A persistent musty smell near an exterior wall deserves attention even when no visible mold or water stain is present. The EPA notes that a moldy or musty odor can indicate mold growth and should be investigated.[3]
Odors may be more noticeable inside closets, beneath windows, near baseboards, or in rooms that receive less airflow.
A musty smell does not prove the siding is leaking. Plumbing, condensation, roof leaks, and foundation moisture can produce similar symptoms, so the source should be traced before repairs begin.
```Warning Sign 2
```Water Stains on Interior Walls or Ceilings
Brown staining, discolored drywall, bubbling paint, or damaged window trim can indicate moisture moving through the wall assembly.
Do not assume the entry point is directly behind the stain. Water can travel along framing, sheathing, flashing, and fasteners before appearing inside.
The inspection should begin above the visible damage and include windows, doors, gutters, roof intersections, utility penetrations, and siding accessories.
```Warning Sign 3
```Loose Siding That Will Not Stay Attached
Repeatedly loose siding can be an installation or wind-damage issue, but deteriorated sheathing can also reduce the ability of fasteners to remain secure.
When one area keeps loosening after being repaired, the contractor should inspect the nailing surface rather than simply adding more fasteners.
Soft or swollen sheathing, damaged housewrap, broken locks, or improperly installed starter strip may all contribute to recurring failure.
```Warning Sign 4
```Soft Wood Around Windows and Doors
Exterior trim that feels soft, swollen, crumbly, or unusually flexible may indicate repeated moisture exposure.
Window and door openings are particularly important because several drainage details meet in a small area. Sill flashing, jamb flashing, head flashing, housewrap, exterior casing, sealants, and siding trim all need to work together.
Installing aluminum capping or new siding over damaged trim without identifying the water source can conceal deterioration rather than repair it.
```Warning Sign 5
```Warped, Sunken, or Uneven Areas of Siding
Wavy siding can result from overdriven nails or normal wall irregularities, but a localized soft or sunken area can also indicate damaged sheathing underneath.
Compare the suspect area with nearby walls. If one section moves inward more easily, appears depressed, or no longer supports fasteners, the concealed substrate should be inspected.
New siding should not be installed over rotten wall materials. PEPA specifically advises replacing rotten existing materials before new vinyl siding is applied.[2]
```Where Hidden Water Damage Commonly Starts
```- Below windows
- Above windows and exterior doors
- Roof-to-wall intersections
- Lower ends of rooflines near gutters
- Deck and porch connections
- Exterior faucets and hose bibs
- Electrical boxes and exterior lights
- Dryer and bathroom exhaust vents
- Air-conditioning and refrigerant penetrations
- Chimneys and masonry transitions
- Inside and outside corners
- Areas damaged by wind or hail
Window Flashing Is a Major Inspection Point
```PEPA installation guidance states that flashing should be integrated with the water-resistive barrier around windows, doors, other openings, corners, and roof intersections.[2]
A window can appear properly trimmed from the exterior while concealed flashing is missing or reverse-lapped behind the siding.
If water stains repeatedly appear beneath a window after storms, removing selected siding may be necessary to verify the sill, jamb, head flashing, and condition of the sheathing.
```Roof-to-Wall Intersections Deserve Special Attention
```Areas where a sloped roof terminates against siding receive concentrated runoff and can be vulnerable when step flashing or kick-out flashing is missing or improperly integrated.
PEPA provides specific sidewall-flashing guidance intended to direct water away from the wall and into the drainage path.[4]
Rot near the lower edge of a roof, at a gutter end, or below a porch roof should be investigated before damaged trim or siding is simply covered.
```Insect Activity Can Be a Clue
```Insects do not automatically mean water is present, but damp or deteriorated wood can create favorable conditions for certain pests.
Repeated ant, beetle, or wasp activity near the same siding opening, window corner, or damaged trim area may justify a closer inspection.
The goal should be to correct unintended openings and moisture conditions without blocking required drainage or ventilation.
```Rising Utility Bills or Cold Wall Areas
```Wet or displaced insulation can contribute to reduced thermal performance, although utility costs can also change because of weather, energy rates, HVAC performance, windows, and air leakage.
If one exterior wall feels unusually cold and the area also has stains, drafts, or known siding damage, the wall cavity may deserve inspection.
Replacing the siding alone will not restore insulation that has become wet, compressed, or contaminated.
```What a Professional Moisture Inspection May Include
```- Exterior visual inspection: Reviewing siding, windows, doors, rooflines, gutters, penetrations, and trim.
- Interior inspection: Looking for stains, odors, damaged drywall, cold areas, or deteriorated trim.
- Moisture measurements: Comparing suspect wall areas with known dry reference locations.
- Selective siding removal: Opening a limited area to see the water-resistive barrier, flashing, and sheathing.
- Sheathing evaluation: Checking for staining, swelling, softness, loss of fastener holding, or deterioration.
- Flashing inspection: Determining whether materials overlap in a way that directs water toward the exterior.
Can a Moisture Meter Find Water Behind Siding?
```Moisture meters can provide useful information, but one reading should not be treated as a complete diagnosis. Different materials, fasteners, temperatures, and wall assemblies can influence results.
A moisture meter is most useful when readings are compared across several locations and interpreted together with visible symptoms and construction details.
When readings remain elevated in a suspicious area, selective removal may be the most direct way to determine what is happening behind the siding.
```What About Thermal Cameras?
```Infrared imaging can identify unusual surface-temperature patterns that sometimes help locate wet insulation, air leakage, or moisture-related conditions.
However, a thermal image shows temperature differences rather than water itself. Sun exposure, HVAC ducts, insulation gaps, and framing can create similar patterns.
Thermal imaging works best as a screening tool combined with moisture readings and direct inspection.
```When the Siding Should Be Removed
```Selective removal is often justified when several warning signs point to the same location or when interior symptoms continue after obvious exterior maintenance has been completed.
- Recurring water stains after rain
- Soft exterior trim
- Persistent musty odor
- Elevated moisture readings
- Loose siding that will not remain fastened
- Visible deterioration behind a missing panel
- Known window or roof flashing failure
- Storm damage that exposed the wall assembly
Do Not Cover Wet Materials
```If opening the wall reveals wet insulation, sheathing, framing, or other materials, the source should be corrected and the assembly allowed to dry before it is covered again.
The EPA emphasizes that moisture control is the key to mold control and recommends drying water-damaged areas and materials within approximately 24 to 48 hours when possible.[5]
Materials that are deteriorated, contaminated, or unable to dry adequately may require removal rather than simply being enclosed behind new siding.
```What Hidden Water Damage Can Affect
```- Wall sheathing: Repeated wetting can soften or swell wood-based panels and reduce fastener holding.
- Framing: Long-term moisture can contribute to wood deterioration.
- Insulation: Wet, displaced, or compressed insulation may provide less consistent thermal performance.
- Drywall: Moisture may cause staining, softness, bubbling paint, or deterioration.
- Interior trim: Wood can swell, stain, or decay near repeated leaks.
- Fasteners: A weakened substrate may no longer hold siding securely.
Why Quad Cities Homes Deserve Regular Moisture Checks
```Davenport, Bettendorf, Moline, Rock Island, and surrounding communities experience heavy thunderstorms, wind-driven rain, snow, freezing temperatures, summer humidity, and large seasonal temperature swings.
Many homes in the region also contain siding, windows, and exterior details installed decades ago. Those materials may still perform well, but sealants, flashing details, roof intersections, and penetrations can change over time.
Inspecting known problem areas after severe storms and before winter can help identify a small moisture problem before it becomes a larger wall repair.
``````“Hidden water damage is rarely diagnosed by looking at one siding panel. We follow the water path and look closely at windows, roof intersections, flashing, housewrap, penetrations, and the sheathing underneath. The earlier that moisture source is found, the better chance there is to keep the repair limited.”
```
A Step-by-Step Approach if You Suspect Hidden Water Damage
```- Photograph the symptoms. Document stains, loose siding, soft trim, and the surrounding exterior.
- Consider when the problem appears. Note whether symptoms occur during wind-driven rain, snow melt, or continuously.
- Inspect above the damage. Look at windows, rooflines, gutters, penetrations, decks, and trim.
- Check for moisture indicators inside. Look for stains, odors, peeling paint, damaged trim, or soft drywall.
- Use diagnostic tools when appropriate. Moisture meters and infrared imaging may help narrow the investigation.
- Open the wall selectively if necessary. Remove enough siding to inspect flashing, housewrap, and sheathing directly.
- Repair the source before the symptom. Correct flashing, roofing, drainage, or penetration problems before replacing the siding.
- Dry and repair the wall. Replace damaged materials and allow wet assemblies to dry before closing them.
Do Not Rely on Caulk Alone
```Applying more caulk to the outside may temporarily change a leak, but it does not recreate missing flashing or repair a damaged drainage plane.
Excessive sealant can also trap water by closing openings that were intended to drain.
Durable repairs rely on correct layering and drainage first, with sealant used only where the applicable product and detail require it.
```Concerned About Water Behind Your Siding?
```Hidden moisture can affect sheathing, insulation, framing, and interior finishes before the exterior damage becomes obvious.
Schedule a free exterior inspection with Suburban Construction to evaluate siding, flashing, water-management details, and possible concealed damage throughout the Quad Cities.
```Standards and Technical References
```- Polymeric Exterior Products Association, Vinyl Siding Installation Best Practices — Water-Resistive Barriers.
- Polymeric Exterior Products Association and the Vinyl Siding Institute, Vinyl Siding Installation Manual.
- United States Environmental Protection Agency, Mold Odors and Moisture Control Guidance.
- Polymeric Exterior Products Association, Horizontal Siding Installation — Sidewall and Kick-Out Flashing Guidance.
- United States Environmental Protection Agency, Mold, Moisture, and Drying Water-Damaged Materials.
- Current installation instructions, flashing requirements, technical specifications, compatibility information, and warranty documents published by the manufacturers of the installed siding, windows, doors, housewrap, roofing, and exterior accessories.
Technical note: Water stains, odors, loose siding, and elevated moisture readings can result from exterior rain, roof leaks, window or door installation, plumbing, condensation, indoor humidity, or combinations of these conditions. This article provides general educational information and does not replace a project-specific moisture investigation, mold assessment, manufacturer instructions, or evaluation by a qualified building-envelope professional.
```Share This Post
Share it on Facebook or X, or send it through your device share sheet for Instagram.